Microsoft Office Excel is a spreadsheet-application which a good mean to store data in spreadsheet in a table (tabular) form. In this article, we will see how to display data (retrive data or read data) from an Excel spreadsheet using ASP.NET.

We are going to read an Excel file in ASP.NET. Our ASP page will be on remote server and an Excel file in our desktop. First of all we need to upload it to a remote server and then retrive the data. So we are design a form to upload an excel. There will be possibility that we have to retrive data from a file again and again so we will rename Excel and then upload it.
<%@ Page Language=”VB” AutoEventWireup=”false” CodeFile=”Default.aspx.vb” Inherits=”_Default” %>
<!DOCTYPE html PUBLIC “-//W3C//DTD XHTML 1.0 Transitional//EN” “http://www.w3.org/TR/xhtml1/DTD/xhtml1-transitional.dtd”>
<html xmlns=”http://www.w3.org/1999/xhtml”>
<head runat=”server”>
<title>Read and Display Data From an Excel File (.xsl or .xlsx) in ASP.NET</title>
<style type=”text/css”>
tr.sectiontableentry1 td,
tr.sectiontableentry2 td {
padding: 4px;
}
tr.sectiontableentry1 td {
padding: 8px 5px;
background: url(hline.gif) repeat-x bottom;
}
tr.sectiontableentry2 td {
padding: 8px 5px;
background: url(hline.gif) repeat-x bottom #F2F2F2;
}
</style>
</head>
<body>
<form id=”form1″ runat=”server”>
<div>
<table style=”padding: 5px; font-size: 11px;” align=”center” border=”0″>
<tbody>
<tr>
<td>
<strong>Please Select Excel file containing job details…</strong>
</td>
</tr>
<tr>
<td>
<div style=”background: url(hline.gif) repeat-x bottom #F2F2F2;padding: 8px 5px;border-bottom: 1px solid #ccc;”>
<asp:FileUpload ID=”txtFilePath” runat=”server”></asp:FileUpload>
<asp:Button ID=”btnUpload” runat=”server” Text=”Upload” /><br />
<asp:Label ID=”lblMessage” runat=”server” Visible=”False” Font-Bold=”True”
ForeColor=”#009933″></asp:Label>
</div>
</td>
</tr>
<tr>
<td>
<asp:GridView ID=”grvExcelData” runat=”server”>
<RowStyle CssClass=”sectiontableentry2″ />
<AlternatingRowStyle CssClass=”sectiontableentry1″ />
</asp:GridView>
</td>
</tr>
</tbody>
</table>
</div>
</form>
</body>
</html>
Connection to Excel with Microsoft OLE DB Provider for Jet
The Microsoft OLE DB Provider for Jet(stands for Joint Engine Technology is a database engine) provides an OLE DB interface to Microsoft Access databases, and allows SQL Server 2005 and later distributed queries to query Access databases and Excel spreadsheets. We will connect to a Microsoft Excel workbook using the Microsoft OLE DB Provider for Jet 4.0, read data and then display the data in a GridView.
xlsx (Excel 2007) contains Microsoft.ACE.OLEDB.12.0 as the provider. This is the new Access database engine OLE DB driver and is also capable of reading Excel 2003. We are going to use it to read xlsx (Excel 2007) data.
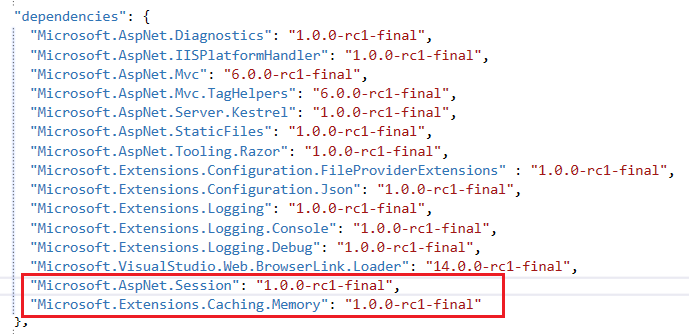
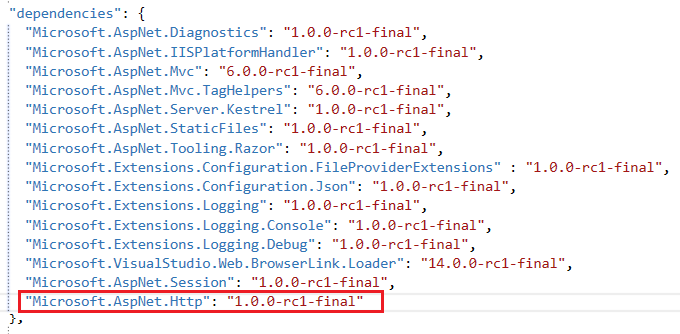
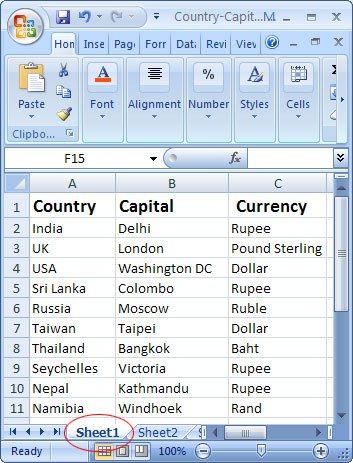
We have a excel file whose content are as shown below. Note here sheet name must be same, means if want to read data from Sheet1. You must take care while writting SQL query because SELECT * FROM [Sheet1$] and SELECT * FROM [sheet1$] are two different queries.
VB.NET Code
Protected Sub btnUpload_Click(ByVal sender As Object, ByVal e As System.EventArgs) Handles btnUpload.Click
If (txtFilePath.HasFile) Then
Dim conn As OleDbConnection
Dim cmd As OleDbCommand
Dim da As OleDbDataAdapter
Dim ds As DataSet
Dim query As String
Dim connString As String = “”
Dim strFileName As String = DateTime.Now.ToString(“ddMMyyyy_HHmmss”)
Dim strFileType As String = System.IO.Path.GetExtension(txtFilePath.FileName).ToString().ToLower()
‘Check file type
If strFileType.Trim = “.xls” Or strFileType.Trim = “.xlsx” Then
txtFilePath.SaveAs(Server.MapPath(“~/UploadedExcel/” & strFileName & strFileType))
Else
lblMessage.Text = “Only excel files allowed”
lblMessage.ForeColor = Drawing.Color.Red
lblMessage.Visible = True
Exit Sub
End If
Dim strNewPath As String = Server.MapPath(“~/UploadedExcel/” & strFileName & strFileType)
‘Connection String to Excel Workbook
If strFileType.Trim = “.xls” Then
connString = “Provider=Microsoft.Jet.OLEDB.4.0;Data Source=” & strNewPath & “;Extended Properties=””Excel 8.0;HDR=Yes;IMEX=2″””
ElseIf strFileType.Trim = “.xlsx” Then
connString = “Provider=Microsoft.ACE.OLEDB.12.0;Data Source=” & strNewPath & “;Extended Properties=””Excel 12.0;HDR=Yes;IMEX=2″””
End If
query = “SELECT * FROM [Sheet1$]”
‘Create the connection object
conn = New OleDbConnection(connString)
‘Open connection
If conn.State = ConnectionState.Closed Then conn.Open()
‘Create the command object
cmd = New OleDbCommand(query, conn)
da = New OleDbDataAdapter(cmd)
ds = New DataSet()
da.Fill(ds)
grvExcelData.DataSource = ds.Tables(0)
grvExcelData.DataBind()
da.Dispose()
conn.Close()
conn.Dispose()
Else
lblMessage.Text = “Please select an excel file first”
lblMessage.ForeColor = Drawing.Color.Red
lblMessage.Visible = True
End If
End Sub
C#.NET Code
protected void btnUpload_Click(object sender, EventArgs e)
{
if ((txtFilePath.HasFile))
{
OleDbConnection conn = new OleDbConnection();
OleDbCommand cmd = new OleDbCommand();
OleDbDataAdapter da = new OleDbDataAdapter();
DataSet ds = new DataSet();
string query = null;
string connString = “”;
string strFileName = DateTime.Now.ToString(“ddMMyyyy_HHmmss”);
string strFileType = System.IO.Path.GetExtension(txtFilePath.FileName).ToString().ToLower();
//Check file type
if (strFileType == “.xls” || strFileType == “.xlsx”)
{
txtFilePath.SaveAs(Server.MapPath(“~/UploadedExcel/” + strFileName + strFileType));
}
else
{
lblMessage.Text = “Only excel files allowed”;
lblMessage.ForeColor = System.Drawing.Color.Red;
lblMessage.Visible = true;
return;
}
string strNewPath = Server.MapPath(“~/UploadedExcel/” + strFileName + strFileType);
//Connection String to Excel Workbook
if (strFileType.Trim() == “.xls”)
{
connString = “Provider=Microsoft.Jet.OLEDB.4.0;Data Source=” + strNewPath + “;Extended Properties=\”Excel 8.0;HDR=Yes;IMEX=2\””;
}
else if (strFileType.Trim() == “.xlsx”)
{
connString = “Provider=Microsoft.ACE.OLEDB.12.0;Data Source=” + strNewPath + “;Extended Properties=\”Excel 12.0;HDR=Yes;IMEX=2\””;
}
query = “SELECT * FROM [Sheet1$]”;
//query = “SELECT [Country],[Capital] FROM [Sheet1$] WHERE [Currency]=’Rupee’”
//query = “SELECT [Country],[Capital] FROM [Sheet1$]”
//Create the connection object
conn = new OleDbConnection(connString);
//Open connection
if (conn.State == ConnectionState.Closed) conn.Open();
//Create the command object
cmd = new OleDbCommand(query, conn);
da = new OleDbDataAdapter(cmd);
ds = new DataSet();
da.Fill(ds);
grvExcelData.DataSource = ds.Tables[0];
grvExcelData.DataBind();
lblMessage.Text = “Data retrieved successfully! Total Records:” + ds.Tables[0].Rows.Count;
lblMessage.ForeColor = System.Drawing.Color.Green;
lblMessage.Visible = true;
da.Dispose();
conn.Close();
conn.Dispose();
}
else
{
lblMessage.Text = “Please select an excel file first”;
lblMessage.ForeColor = System.Drawing.Color.Red;
lblMessage.Visible = true;
}
}
We have tested above code and got result as shown below:

ASP.NET 4.6 Hosting with HostForLIFE.eu
HostForLIFE.eu is European Windows Hosting Provider which focuses on Windows Platform only. They deliver on-demand hosting solutions including Shared hosting, Reseller Hosting, Cloud Hosting, Dedicated Servers, and IT as a Service for companies of all sizes. They have customers from around the globe, spread across every continent. We serve the hosting needs of the business and professional, government and nonprofit, entertainment and personal use market segments.
 HostForLIFE.eu is Microsoft No #1 Recommended Windows and ASP.NET Hosting in European Continent. Our service is ranked the highest top #1 spot in several European countries, such as: Germany, Italy, Netherlands, France, Belgium, United Kingdom, Sweden, Finland, Switzerland and many top European countries.
HostForLIFE.eu Hosting is the first host to offer its customer all the new features of the ASP.NET 4.6 Hosting. You can simply deploy your ASP.NET 4.6 website via our world-class Control Panel or conventional FTP tool. This ASP.NET 4.6 Hosting is part of HostForLIFE.eu service and it is provided free of charge.