Top 3 Social Media Management Tools

If you are on the internet, you probably have your own social media account as well. That is the manner by which a great rise has been with regards to the utilization of social networking platforms by clients all around the world.

Whether it is businesses, professionals or individuals, most have an important existence on social media websites. In reality, you are likely to come across the same set of businesses and individuals on more than one social networking websites such as Google+, Instagram, Facebook, LinkedIn, and Twitter.

Also, in that lies the difficult part. Most businesses or people make their pages or profiles on various social networks, yet neglect to manage the updates, posts or even analytics. This powers the need to have effective social media management tools (SMM) that make it simple for you to manage one or more social media profiles and pages.

These tools can likewise help you in accomplishing more traffic to get more followers or likes. What’s more, for businesses, it triggers a good number of leads that can possibly change into customers or sales. So, what are the top 3 social media management tools? Let us take a look at some of these tools by considering their features.
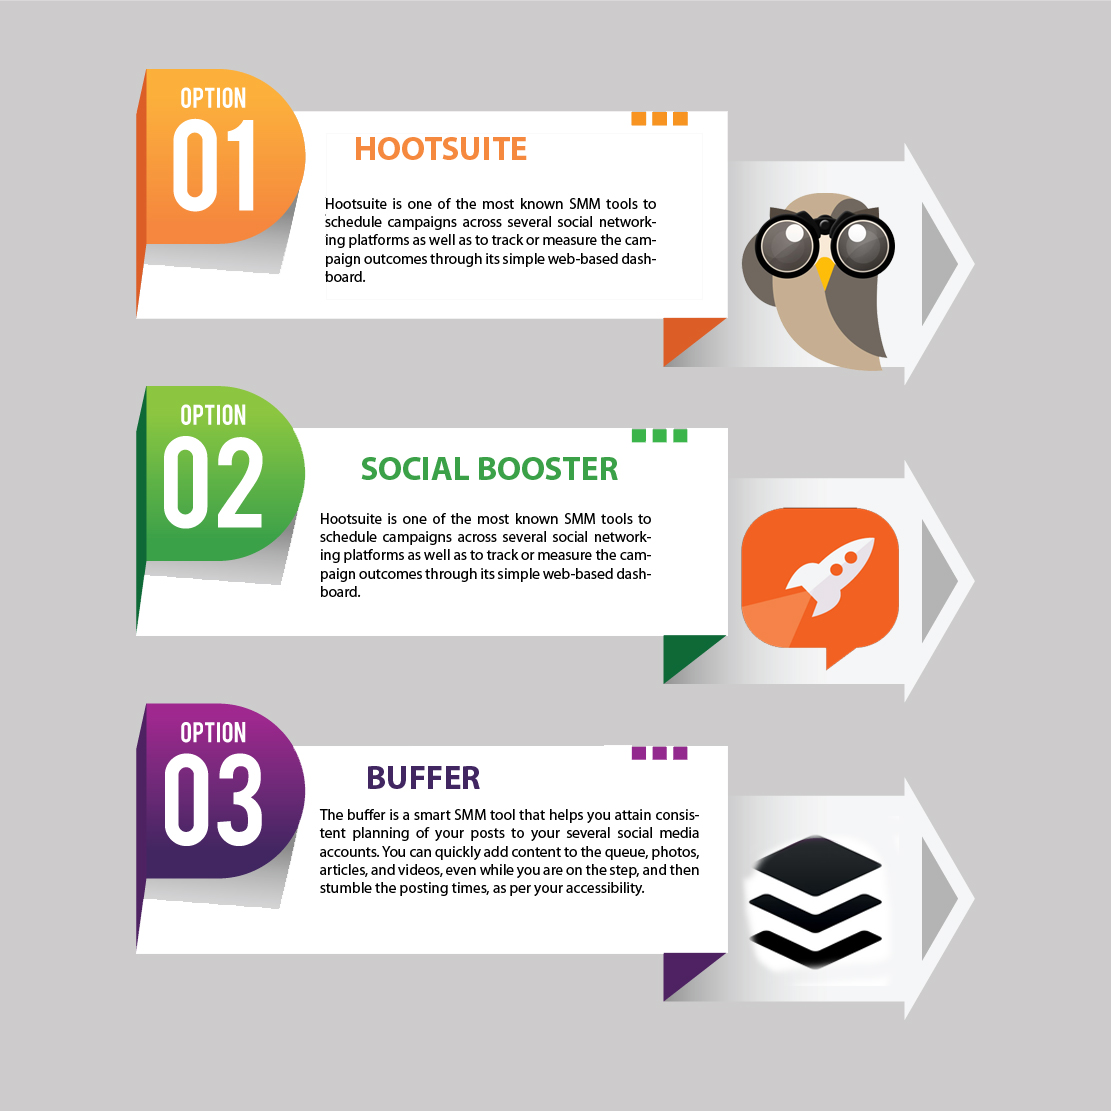
Basic RGB

HOOTSUITE

Hootsuite is one of the most known SMM tools to schedule campaigns across several social networking platforms as well as to track or measure the campaign outcomes through its simple web-based dashboard.

 It permits you to schedule tweets and messages, manage unlimited social media profiles, track conversations, offers Facebook insights integration and view Google Analytics.

HootSuite shows all your social media accounts in different streams and gives good team teamwork features that can optimize the general profitability of your business. It likewise gives you access to around six social media marketing online courses, along with the choice to get ensured in SMM.

SOCIAL BOOSTER

Social Booster is another very extensive SMM solution that makes SMM truly simple. It automates the process of posting updates by planning them ahead of time and keeping your social media presence busy, even while you are offline.

It also gives you access to a single dashboard that you can use to manage your different social media accounts and keeping engaged with your audience at all times.

Besides, you can get a complete knowledge into the execution of your campaigns and social media activities, which help you build up a sound comprehension of your audience and you, can get these reports on interest.

For businesses, Social Booster likewise empowers you to make a work process from the dashboard for your team members, which will build your general business efficiency. It also helps your business expand its scope through expanded use of social media, without investing extra energy for the same time.

BUFFER

The buffer is a smart SMM tool that helps you attain consistent planning of your posts to your several social media accounts. You can quickly add content to the queue, photos, articles, and videos, even while you are on the step, and then stumble the posting times, as per your accessibility.

This is possible through using the several browser extensions and Buffer mobile apps. You can also get analytics and valuable knowledge about the traffic drawn to your social media content with the Buffer app.

Indeed, in this age of the mobile uprising technology, most individual access social media on the go and, subsequentlyFind Article, these known tools allow you to accomplish the same by planning your posts and managing them from a single dashboard.

Natural Search Engine Optimization (SEO)

the-employee-performance-continuumNatural search engine optimization (SEO), otherwise known as organic search engine optimization, is concerned with maximizing the visibility of a web site by making its listings appear more frequently and more prominently in organic search results. With organic SEO services, you will drive more targeted traffic to relevant in-site categories and landing pages. Natural search engine optimization usually gives you a much higher return on investment than other SEO methods such as pay per click.

Natural search engine optimization is accomplished by optimizing your web pages and by increasing your “link popularity” by acquiring or paying for links that point to your web site. This gives you high rankings at the Search Engines for your chosen search terms. The natural SEO results give a specific classification to your topic that makes it easy for consumers to find you in the search engine pages. It also refers to pages that are seeded with keywords by your customers such as pinged blogs and forums.

Organic SEO tends to be easier for people to read, while the algorithms are friendlier to the search engine spiders. Organic search engine optimization is a collective discipline of practices that yields higher organic search engine rankings. These practices include directory submission, search engine compatibility analysis, placement of meta tags, article submissions, website competitiveness analysis, link popularity development, content optimization and keyword marketing research.

Organic SEO thrives on content; it therefore demands more creativity and more relevancy than any other method. The various organic SEO strategies include detailed research into keywords and click-through rates, competitor analysis, adherence to search engine guidelines, and an audit of site content, code, architecture and link structure. Natural SEO can also target different types of search, including image search, local search and industry specific vertical search engines.

Organic SEO techniques are the most cost-effective method to reach your customer. HoweverHealth Fitness Articles, the biggest weakness of natural search engine optimization is the time required to generate links and “tweak” your web pages and keywords to get those prized high rankings you so desire.

How To Create a New FTP Site Using IIS Manager

  1. In this post we will show you how to create a new FTP site using IIS manager. The new FTP service makes it easy to create new FTP sites by providing you with a wizard that walks you through all of the required steps to create a new FTP site from scratch.

    Step 1: Use the FTP Site Wizard to Create an FTP Site

    In this first step you will create a new FTP site that anonymous users can open.

    Note: The settings listed in this walkthrough specify “%SYSTEMDRIVE%\inetpub\ftproot” as the path to your FTP site. You are not required to use this path; however, if you change the location for your site you will have to change the site-related paths that are used throughout this walkthrough.

    1. Open IIS Manager. In the Connections pane, click the Sites node in the tree.
    2. As shown in the image below, right-click the Sites node in the tree and click Add FTP Site, or click Add FTP Site in the Actions pane.
      • Create a folder at “%SystemDrive%\inetpub\ftproot”
      • Set the permissions to allow anonymous access:
        • Open a command prompt.
        • Type the following command:
1ICACLS “%SystemDrive%\inetpub\ftproot” /Grant IUSR:R /T
  • Close the command prompt.

iism

When the Add FTP Site wizard appears:

  • Enter “My New FTP Site” in the FTP site name box, then navigate to the %SystemDrive%\inetpub\ftproot folder that you created in the Prerequisites section. Note that if you choose to type in the path to your content folder, you can use environment variables in your paths.
  • When you have completed these items, click Next.

On the next page of the wizard:

  • Choose an IP address for your FTP site from the IP Address drop-down, or choose to accept the default selection of “All Unassigned.” Because you will be using the administrator account later in this walk-through, you must ensure that you restrict access to the server and enter the local loopback IP address for your computer by typing “127.0.0.1” in the IP Address box. (Note: If you are using IPv6, you should also add the IPv6 localhost binding of “::1”.)
  • Enter the TCP/IP port for the FTP site in the Port box. For this walk-through, choose to accept the default port of 21.
  • For this walk- through, do not use a host name, so make sure that the Virtual Host box is blank.
  • Make sure that the Certificates drop-down is set to “Not Selected” and that the Allow SSL option is selected.
  • When you have completed these items, click Next.

On the next page of the wizard:

  • Select Anonymous for the Authentication settings.
  • For the Authorization settings, choose “Anonymous users” from the Allow access to drop-down, and select Read for the Permissions option.
  • When you have completed these items, click Finish.

Summary

You have successfully created a new FTP site using the new FTP service. To recap the items that you completed in this step:

  1. You created a new FTP site named “My New FTP Site”, with the site’s content root at “%SystemDrive%\inetpub\ftproot”.
  2. You bound the FTP site to the local loopback address for your computer on port 21, and you chose not to use Secure Sockets Layer (SSL) for the FTP site.
  3. You created a default rule for the FTP site to allow anonymous users “Read” access to the files.

Step 2: Adding Additional FTP Security Settings

Creating a new FTP site that anonymous users can browse is useful for public download sites, but web authoring is equally important. In this step, you add additional authentication and authorization settings for the administrator account. To do so, follow these steps:

  • In IIS Manager, click the node for the FTP site that you created earlier, then double-click FTP Authentication to open the FTP authentication feature page.
  • When the FTP Authentication page displays, highlight Basic Authentication and then click Enable in the Actions pane.
  • In IIS Manager, click the node for the FTP site to re-display the icons for all of the FTP features.
  • You must add an authorization rule so that the administrator can log in. To do so, double-click the FTP Authorization Rules icon to open the FTP authorization rules feature page.
  • When the FTP Authorization Rules page is displayed, click Add Allow Rule in the Actions pane.
  • When the Add Allow Authorization Rule dialog box displays:
    • Select Specified users, then type “administrator” in the box.
    • For Permissions, select both Read and Write.
    • When you have completed these items, click OK.

Summary

To recap the items that you completed in this step:

  1. You added Basic authentication to the FTP site.
  2. You added an authorization rule that allows the administrator account both “Read” and “Write” permissions for the FTP site.

Step 3: Logging in to Your FTP Site

In Step 1, you created an FTP site that anonymous users can access, and in Step 2 you added additional security settings that allow an administrator to log in. In this step, you log in anonymously using your administrator account.

Note: In this step log in to your FTP site using the local administrator account. When creating the FTP site in Step 1 you bound the FTP site to the local loopback IP address. If you did not use the local loopback address, use SSL to protect your account settings. If you prefer to use a separate user account instead of the administrator account, set the correct permissions for that user account for the appropriate folders.

Logging in to your FTP site anonymously

  1. On your FTP server, open a command prompt session.
  2. Type the following command to connect to your FTP server:FTP localhost
  3. When prompted for a user name, enter “anonymous”.
  4. When prompted for a password, enter your email address.

You should now be logged in to your FTP site anonymously. Based on the authorization rule that you added in Step 1, you should only have Read access to the content folder.

Logging in to your FTP site using your administrator account

  1. On your FTP server, open a command prompt session.
  2. Type the following command to connect to your FTP server:FTP localhost
  3. When prompted for a user name, enter “administrator”.
  4. When prompted for a password, enter your administrator password.

You should now be logged in to your FTP site as the local administrator. Based on the authorization rule that you added in Step 2 you should have both Read and Write access to the content folder.

Summary

To recap the items that you completed in this step:

  1. You logged in to your FTP site anonymously.
  2. You logged in to your FTP site as the local administrator.